From Plans to Power-Up: What to Expect
During Solar + Battery Installation

The journey from signed contract to system activation is a highly structured process rooted in precision, permitting, and premium craftsmanship. While every project is customized, the general phases below outline what to expect once you’ve approved your system design and are ready for installation.
What You Will Learn
- What to confirm before signing a contract
- What goes into your engineering plan set
- How permits and approvals work
- What your installation timeline may include
- How commissioning works—installer, inspector, utility
- What tools and documentation support your system long-term
Before you sign a contract, best practice is to participate in a detailed load assessment. This upfront step ensures your proposed system aligns with your goals—whether backup, optimization, or both. This planning stage allows you to work with an engineer to clarify your priorities and goals. Spend 30-60 minutes up front aligning on the facts that size the system and drive cost. In that review, you’ll define which circuits must stay on during an outage, how long you want them powered, what your biggest start loads are (heat pump, well/sump pump, fridge), and how the system will switch over (transfer time/ride -through). You’ll also confirm the panel strategy (backup subpanel or smart-circuit approach), where equipment will live, basic protection and code requirements (surge protection, breaker coordination, service size), and a practical path to expand later (extra battery, EV charger, another heat pump), This becomes the scope you’re pricing—so you’re signing a design that matches your home and resilience goals, not a guess.
At minimum, get these in writing:
- Essential circuits + runtime window (e.g., Keep heat,fridge Wi-Fi on for 8-12hours).
- Largest start loads (model numbers and starting amps) and the inverter’s continuous + surge ratings sizes to cover them.
- Transfer expectation (target in milliseconds) and a ride through demo commitment at commissioning.
- Panel/layout plan (backup subpanel or smart circuits labeling,equipment locations)and protection basics (surge/OCPD, any AFCI/GFCI notes.
After you sign, your engineer reconfirms the circuit list, collects nameplate data, produces a one line diagram, finalizes equipment locations for permits, and schedules commissioning with a documented ride-through test—so performance is proven, not assumed.
Before you sign a contract ,best practice is to participate in a detailed load assessment. This upfront step ensures your proposed system aligns with your goals—whether backup, optimization, or both. This planning stage allows you to work with an engineer to clarify your priorities and goals. At minimum, get these in writing:
- Essential circuits + runtime window (e.g., Keep heat,fridge Wi-Fi on for 8-12hours).
- Largest start loads (model numbers and starting amps) and the inverter’s continuous + surge ratings sizes to cover them.
- Transfer expectation (target in milliseconds) and a ride through demo commitment at commissioning.
- Panel/layout plan (backup subpanel or smart circuits labeling,equipment locations)and protection basics (surge/OCPD, any AFCI/GFCI notes.
After you sign, your engineer reconfirms the circuit list, collects nameplate data, produces a one line diagram, finalizes equipment locations for permits, and schedules commissioning with a documented ride-through test—so performance is proven, not assumed.
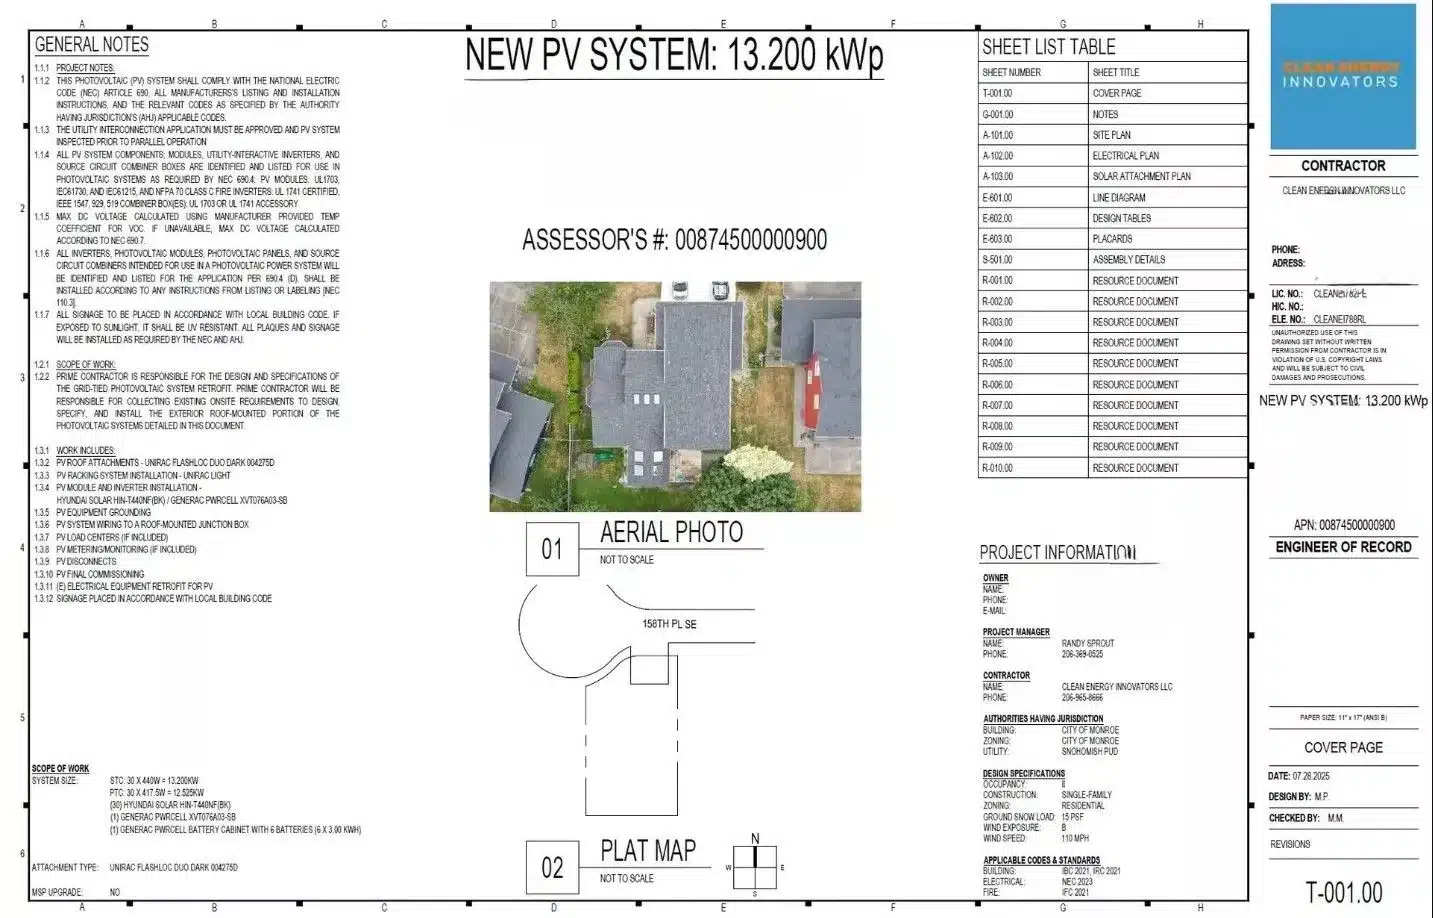
Step 1: Engineering Plan Set
Your system design is translated into a formal engineering plan set. This technical drawing package includes:
- A one-line electrical diagram showing the integration of solar, batteries, inverters, backup panels, and optional generators
- Equipment specifications and layout schematics
- Load calculations and basic energy modeling
- A map of which household circuits will be backed up during an outage
- Structural review (if roof or wall-mounted components require additional verification)
The plan set is crafted to comply with all applicable national, state, and local codes. In most residential projects, this plan is produced by a qualified in-house designer or third-party engineering team. While some jurisdictions require plan stamping by a licensed Professional Engineer (PE), this is relatively rare in residential battery and solar installations.
For a complete guide to load assessments, system sizing, and what should be in your engineering plan set, explore our free Battery Learning Center.
Once finalized, your installation partner submits this plan to the city, county, or state authorities for review. Electrical and building permits are requested at this stage, and utility interconnection paperwork is also filed if solar is included. The engineering plan becomes the official blueprint for your installation—and you should always request a copy for your permanent records.
Once finalized, your installation partner submits this plan to the city, county, or state authorities for review. Electrical and building permits are requested at this stage, and utility interconnection paperwork is also filed if solar is included. The engineering plan becomes the official blueprint for your installation—and you should always request a copy for your permanent records.
Step 2: Permitting
Your system design is translated into a formal engineering plan set. This technical drawing package includes:
- A one-line electrical diagram showing the integration of solar, batteries, inverters, backup panels, and optional generators
- Equipment specifications and layout schematics
- Load calculations and basic energy modeling
- A map of which household circuits will be backed up during an outage
- Structural review (if roof or wall-mounted components require additional verification)
The plan set is crafted to comply with all applicable national, state, and local codes. In most residential projects, this plan is produced by a qualified in-house designer or third-party engineering team. While some jurisdictions require plan stamping by a licensed Professional Engineer (PE), this is relatively rare in residential battery and solar installations.
Step 3:Pre-Installation Walkthrough
You’ll typically have a final walkthrough on-site before installation begins. In some cases, this may occur earlier during design. This ensures:
- Everyone agrees on conduit routing and equipment placement
- We’ve reviewed potential service shutoffs and backup load priorities
- Any concerns (from pets to driveway access) are addressed ahead of time
The Installation Itself
Most battery-backed systems take 2–5 business days to install, depending on complexity and whether additional trenching, generator tie-ins, or panel upgrades are needed. It should be noted that the installation team is in-house with credentials to match. Optimally, a master electrician is the point person handling all electrical issues.
- Install solar panels
- Mount the battery system securely indoors or outdoors
- Wire and commission smart load panels and/or subpanels
- Integrate with existing main panel and utility meter as required
- Perform firmware updates and grid compliance tests
- A thorough explanation of the entire system, including the apps that monitor and control the system you will be heavily interacting with
What to Expect During Battery + Solar Commissioning in the Puget Sound Region
Once your solar and battery system is fully installed, the final phase—commissioning— ensures your system is safe, functional, and ready to deliver the benefits of backup power and energy savings. In the Puget Sound region, commissioning happens in three distinct stages, each with its own purpose and process.
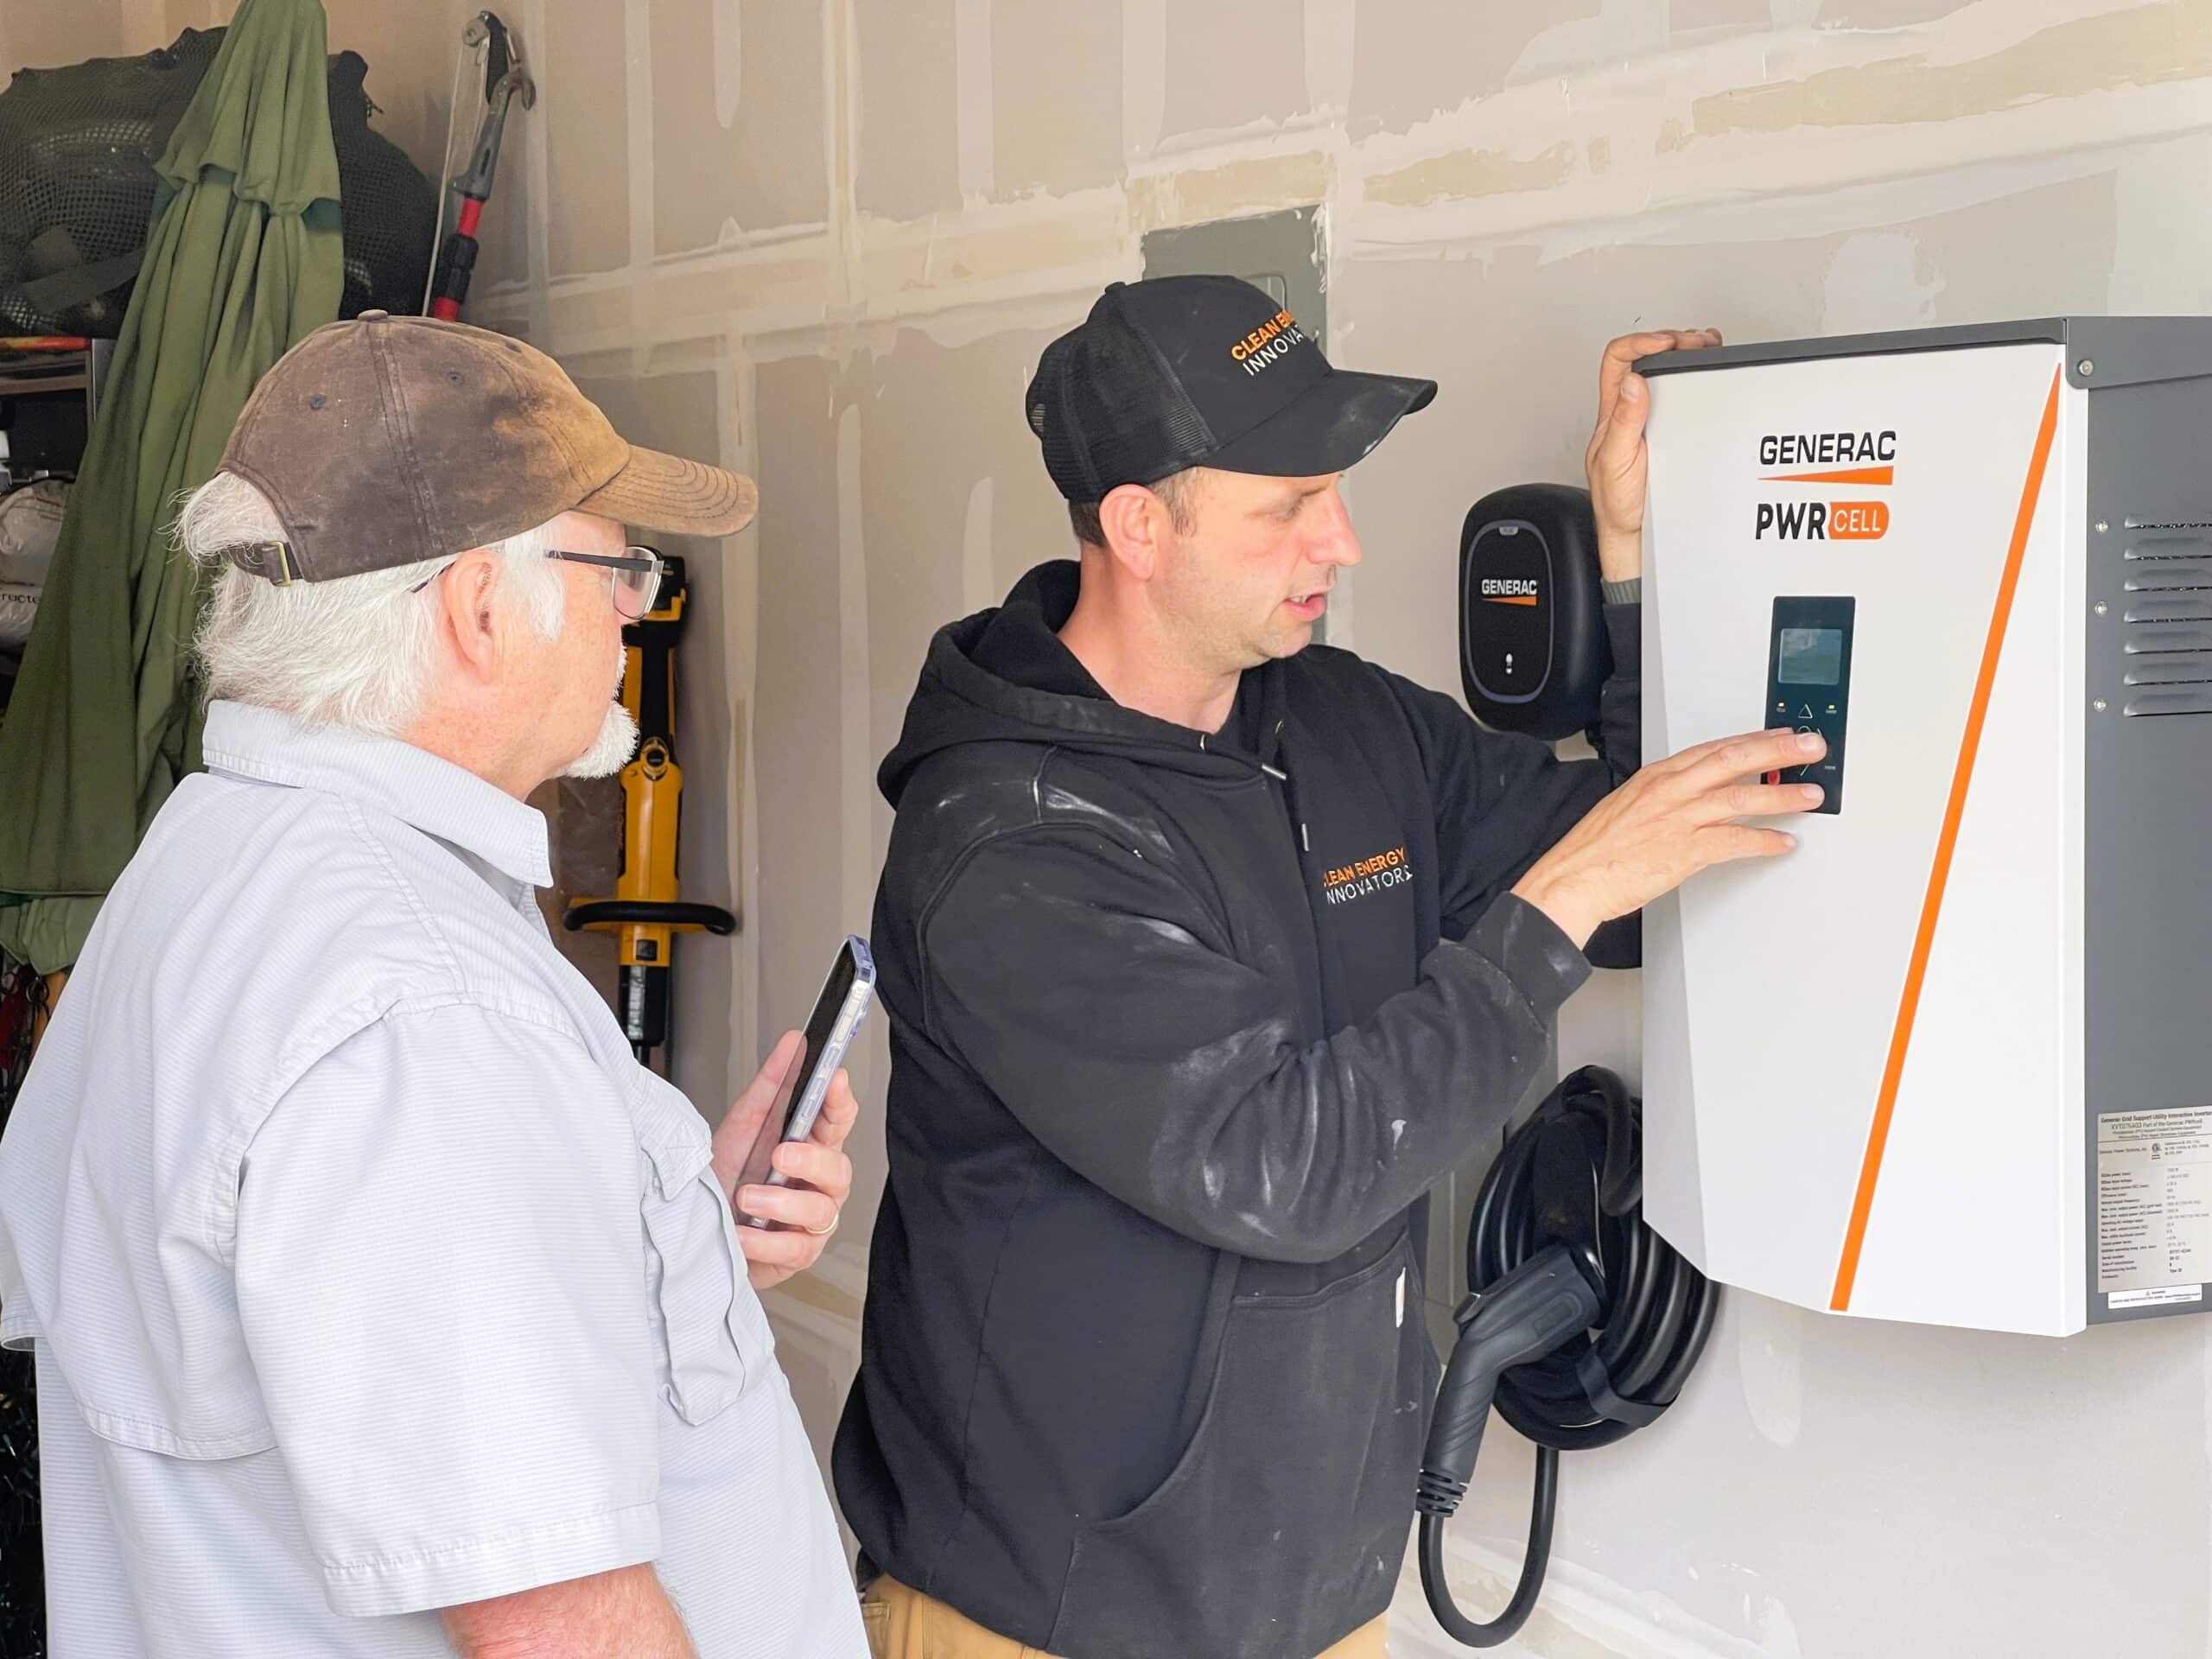
Stage 1: Installer Commissioning and System Orientation
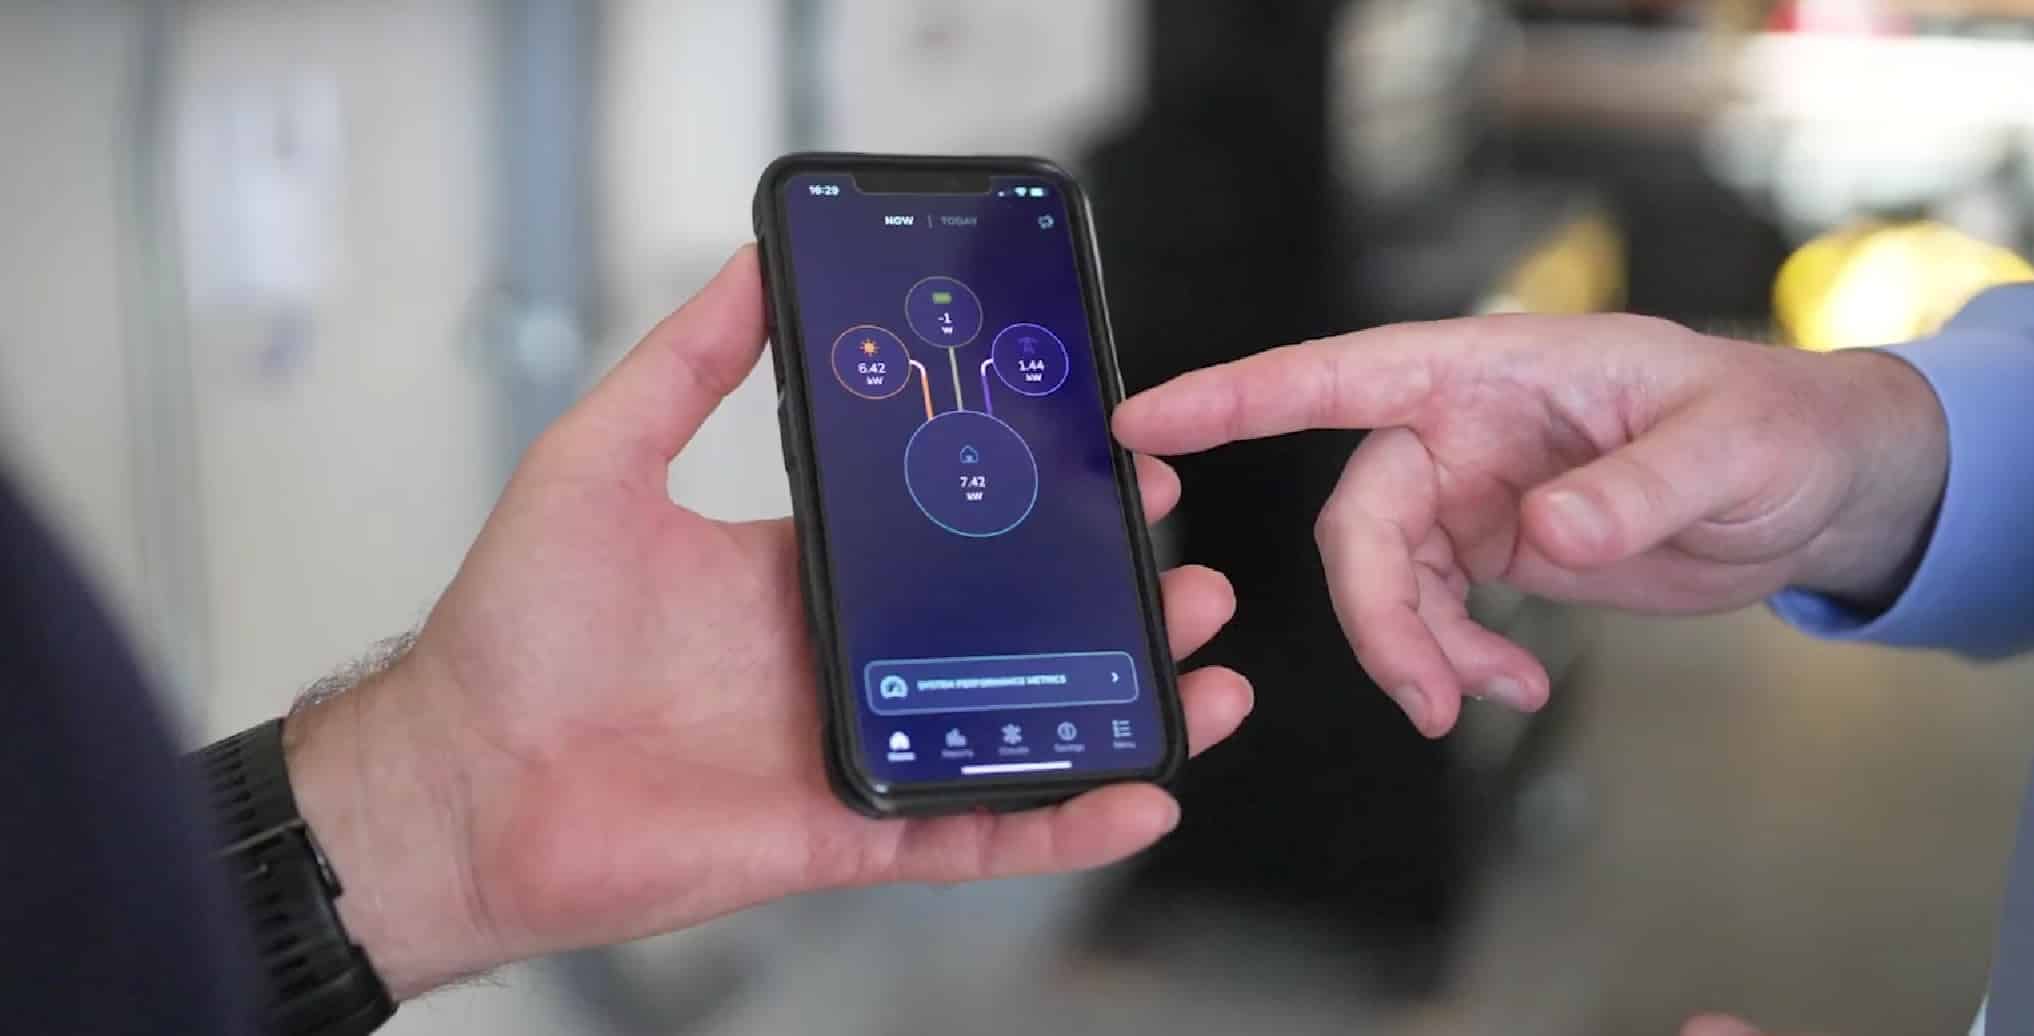
The first step is performed by your installation team. This is a detailed, hands-on walkthrough where every system component—solar panels, battery, inverter, backup circuits, and (if included) generator—is tested for functionality. The team simulates key events, such as power outages or battery discharge cycles, to ensure everything responds properly. They’ll also review your monitoring app, walk you through how to interpret system status and settings, and provide printed or digital reference materials for long-term use. This orientation ensures you understand what your system is capable of, and how it performs under real-world conditions.
Stage 2: Jurisdictional Inspections and Permit Signoff
Before any system can legally operate, it must pass final inspections by your local city or county building department. This typically includes an electrical inspection, and in some cases, a structural or fire code review, depending on the scope of your installation. Your installer will schedule and manage this inspection. While not always visible to the homeowner, this step is critical—it confirms your system meets safety codes and qualifies for legal operation. In many parts of Puget Sound, this process is streamlined but may still require a few days to complete.
Stage 3: Utility Interconnection and Grid Commissioning
If your system includes solar, your utility must approve the interconnection to the grid. This often involves a separate review of the engineering plan set and a physical or remote inspection. Once the utility issues formal Permission to Operate (PTO), your solar panels can begin exporting power, and your battery can operate in full coordination with the grid. Utilities like Puget Sound Energy, SnoPUD, and Seattle City Light each have their own processes and timelines, but your installer should coordinate this step and keep you
A Glimpse into Your Energy Future
Imagine your home not as a passive consumer of electricity, but as an active participant in your energy destiny. With a smart battery system at its core, your home becomes resilient—capable of riding out outages without disruption, reducing reliance on an aging grid, and responding in real-time to rising electricity costs and shifting utility rates.
This is what energy independence looks like: quiet confidence in a storm, seamless transitions during grid failures, and the freedom to use your energy when it serves you best. It’s not just about backup—it’s about building a home that’s ready for the future.
With thoughtful design, intelligent integration, and a system tailored to your unique needs, battery storage isn’t a luxury—it’s a strategic step toward long-term security, sustainability, and self-reliance.
Helpful Tips for a Smooth Solar + Battery Installation
These homeowner-tested tips can help your install go more smoothly—from first walkthrough to final inspection:
-
1. Clear the Work AreaMake sure the installation crew has easy access to your electrical panel, driveway, and battery location. Clear away outdoor furniture, tools, or stored items ahead of time.
-
2. Secure PetsInstallers will be moving in and out frequently. It’s safest—and less stressful for everyone—to keep pets indoors or contained during work hours.
-
3. Be Available for WalkthroughsPlan to be home for your pre-install review and final orientation. Your input on backup load priorities and conduit routing is important.
-
4. Prepare Your Wi-Fi InformationCommissioning includes setting up your monitoring app. Have your Wi-Fi name and password ready to ensure a smooth setup.
-
5. Ask for a System WalkthroughEven if your system is intuitive, take the time to learn your battery’s behavior, app features, and any smart panel functions. You’ll feel more confident using it from day one.
-
6. Request Full DocumentationAsk your installer for a copy of your engineering plan set, approved permits, product warranties, and app login credentials. Keep these in a secure digital or physical folder.